Using Git with Lemonstand
September 05, 2013Lemonstand is an amazing eCommerce platform that provides you with complete control over your frontend site while providing you with powerful tools to build a full featured eCommerce solution. It does not have the expense of many “enterprise solutions” (as it only costs $499) and it provides you with complete server freedom which is impossible with hosted solutions. (This permits you to run custom scripts and create custom database tables, mostly with the help of modules.)
When developing a site with Lemonstand you mostly create templates (layouts, pages, partials) and resource files (css, js, images). Lemonstand provides you with two ways to save and edit these files.
- In the database via the CMS
- In flat files via CMS or text editor
Writing code in their CMS is actually pretty nice, as they employ the ACE editor, but how do you version control your code? More importantly how do you keep code in sync when working with a distributed team? At 320ny we use Git for version control around our application development. Below I will show you how we set up Git to work with Lemonstand. There is no single way to do this so this is just our take on the subject. Hopefully it can provide you with some direction for your own setup.
Create your Git repo
The first step is to create you git repo via github or wherever you have your repos hosted. We use Bitbucket. If using github you would create a new repo and then initialize it like this:
  $ touch README.md
  $ git init
  $ git add README.md
  $ git commit -m "first commit"
  $ git remote add origin git@github.com:your_account/your_repo.git
  $ git push -u origin master
Install Lemonstand
Log into your Lemonstand account and order a commercial or developer license:

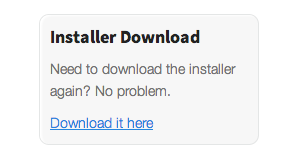
Once ordered download the installer.
Unpack the installer folder and place the contents of folder into your repo. Your file structure should look like this:
  your_repo/
    install.php
    installer_files/
    php.ini
Next proceed to install lemonstand. Be sure to set up a new MySQL database and follow the installation documentation here:
http://lemonstand.com/docs/installing_lemonstand
Add your .gitignore file
Providing version control around a whole Lemonstand installation is a bad idea. You don’t want to track Lemonstand source files because these can get out of sync if one installation gets updates while others do not. The only files you want to track are your code files. First create a .gitignore file.
$ touch .gitignore
and edit it
$ vim .gitignore
Your base setup should look something like this
  # Ignore everything
  /*

  # But not these folders...
  !resources
  !themes
  !templates
Here I am ignoring everything by default except for what I want to track. The first is my resources directory. This is where lemonstand places the css, js, and images files for each site. The second folder is the themes directory. In Lemonstand you can create separate themes for each store. If you work on a theme those files should be under a VCS. The third directory is our templates directory. This directory is not created yet but it is where we will will store the flat files for our layouts, pages, and partials.
You may wish to include/exclude other files. For example we don’t include the .htaccess file because in production we enforce https for the administrative side of the site, something we don’t want to enforce on our local development machines.
Enable File Based Templates
To track your code files with Git you need to enable Lemonstand’s file based template system. The documentation on how this is done can be found here:
http://lemonstand.com/docs/using_file_based_templates
Note that according to our .gitignore file we will list the templates directory as {APP}/templates:
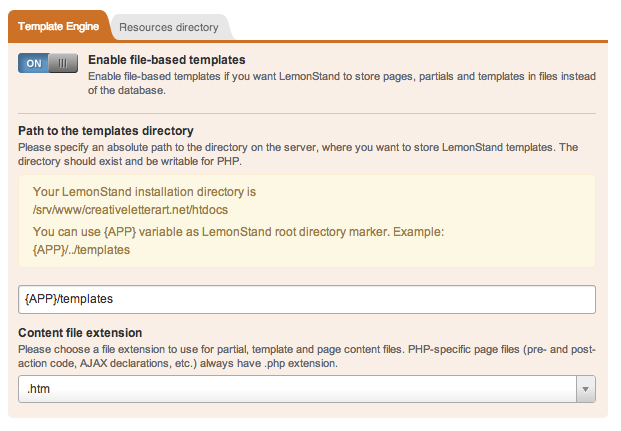
If you wish to store your templates somewhere else please update the .gitignore file.
Committing your templates and resources
At this point you should have a few untracked files in your working tree from the resources and templates directories. Lemonstand populates a home and 404 page by default. Add, commit, and push your changes.
  $ git add .
  $ git commit -m “Set up repo for my awesome Lemonstand store.”
  $ git push origin master
Setting up another location
If you got this far you have a working Lemonstand installation with your code files under version control. The final step is to share your repo with another location and have it working under another Lemonstand installation. This other location could be another developers local machine, a staging server, or your production environment.
Clone your repo
$ git clone git@github.com:your_account/your_repo.git
Your if you followed my .gitignore file your repo will look like this:
  lemonstand_site/
    .git
    .gitignore
    resources/
    themes/
    templates/
Download and copy the lemonstand installer files (install.php, installer_files/, php.ini) into the repo. (When setting up on a remote server I use scp to copy the installer files into the server’s repo.) Create your MySQL database and install Lemonstand as you did before. Once installed you will have to enable file based templates for this installation. Point Lemonstand to the same templates directory you previously set up.
The only thing left to do it a little clean up. When Lemonstand enables file based templates it converted the default templates into files. You can see this if you do a git status
  $ git status
  # On branch master
  # Untracked files:
  #   (use "git add <file>..." to include in what will be committed)
  #
  #      templates/default/pages/404_1/
  #      templates/default/pages/home_1/
  no changes added to commit (use "git add" and/or "git commit -a")
You need to go into the administrative section and navigate to CMS > Pages. Go into each page (404 and home ) and delete them.Your working directory should now be clean.
  $ git status
  # On branch master
  noting to commit (working directory clean)
Create your pages from the files in your repo.

You should now have two pages in Lemonstand tied to your repo files. Your working directory should also be clean. You can also avoid this issue by deleting the page files before you enable file based templates. Either way it is the same number of clicks.
At this point you are all set! You have multiple installations of Lemonstand sharing the same code files plus you get to utilize the superpowers of git. Have fun building your store :)
A few side notes
The above explains how we are work with the orginal Lemonstand. All of this may change after Lemonstand 2 is officially out of beta.
One item of frustration is that not all of the configuration settings for templaes are stored in the flat files. Some items (action, layout template, title, url) are still stored in the database. This means that you will have to manually update these settings. The good new is this issue will be resolved in Lemonstand 2 as discissed here.
Need Squarespace help? Need member logins for Squarespace?
Click here to be notified about new useful links.